
Creating a bootable USB drive macOS installer can save you time and bandwidth when you have a few Macs you want to update or you want a backup copy of your operating system installer. Fortunately, it’s pretty straight forward to create a USB installer for the latest Mac operating system, 10.12 Sierra, and the process is the same as OS X 10.10 Yosemite and OS X 10.11 El Capitan. The main difference is the name change from ‘OS X’ to ‘macOS’.
You will need at least an 8GB USB flash drive as the El Capitan beta is a 4.78GB download. You will need to download the macOS 10.12 installer through the Mac App Store. Once the download completes, do not continue with the install. Instead, follow these steps to create your USB bootable drive.
![]()
Insert your USB drive to the Mac. Select the drive and format your USB drive as Mac OS X extended (journaled) using Disk Utility.

Note the volume mount point here, under Disk Utility, for the next step:

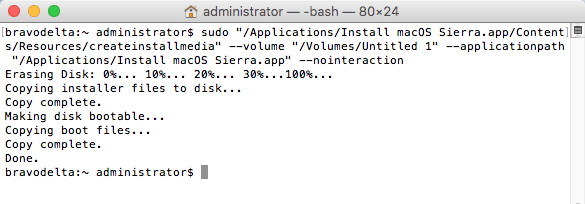
With an administrator account that has a password set, open up terminal and run this command:
sudo "/Applications/Install macOS Sierra.app/Contents/Resources/createinstallmedia" --volume "/Volumes/Untitled 1" --applicationpath "/Applications/Install macOS Sierra.app" --nointeraction

Give it about 20 minutes to complete and your drive will be completed afterwards. Copying files…

And completed.
Your USB drive should now be ready to go. Insert it into a compatible Mac and hold down the option key while the Mac is booting up. Select the “Install macOS Sierra” drive and the boot will continue until it loads the OS X Utilities. Select Install macOS and continue through the macOS 10.12 install wizard.
